Basic Life Support (BLS) Algorithm: Your Step-by-Step Guide
Many emergencies depend on strong Basic Life Support skills. This guide explains the BLS algorithm step by step, from scene safety and checking responsiveness to CPR and AED use. You will also learn how to adjust BLS for special situations and how to avoid common mistakes.
ACLS Certification Association videos have been peer-reviewed for medical accuracy by the ACA medical review board.
Article at a Glance
- Quality basic life support is essential to emergency care.
- ACLS won’t work unless it is preceded by quality basic life support.
- This article reviews the basic life support algorithm.
Explaining Basic Life Support
Advanced Cardiovascular Life Support (ACLS), a critical form of advanced life support, will only work if preceded by satisfactory Basic Life Support (BLS). Providers should make sure to administer high-quality chest compressions along with other practices and assessments as part of the standard basic life support algorithms for healthcare providers, concepts reinforced in BLS certification training and detailed further in ACLS algorithms.

Adult BLS Algorithm Healthcare Providers
Step 1: Confirm the Scene is Safe Before You Approach
Ensure the scene is safe before you approach. Look for hazards like traffic, fire or smoke, electrical wires, chemical exposure, weapons, broken glass, unstable surfaces, or aggressive bystanders. Use standard precautions if available, including gloves and a mask. If the area is unsafe, do not enter until it is secured. Your safety comes first because you cannot help the patient if you become a second victim.
Step 2: Check Responsiveness and Activate Emergency Response
Next, assess the patient. Try to elicit a response by asking them a question or utilize a sternal rub. If the patient is unresponsive, get help and immediately activate the emergency response system by calling emergency medical services (EMS). You can’t work a code alone. Call a code if you are in the hospital or dial 9-1-1 on your cell phone if you are in the field.
Step 3: Check Pulse and Breathing Together for No More Than 10 Seconds
Check for a pulse and assess for breathing at the same time. You’ll feel for a carotid pulse while checking for a chest rise. Don’t spend more than 10 seconds on the assessment.
At this point, there are three patient algorithm scenarios.
Read: Difference Between ACLS and BLS
Step 4: Choose the Correct Path Based on Pulse and Breathing
Your next actions depend on whether the patient has a pulse and whether they are breathing effectively. Use the scenarios below to choose the correct pathway and reassess frequently until EMS arrives.
Scenario 1: Pulse present and normal breathing
In the first scenario, our assessment reveals the patient has adequate pulse and respirations. Continue to watch the patient and continually reassess them until EMS arrives. Make sure they have an airway and maintain it.
Scenario 2: Pulse present and abnormal or absent breathing
In the second scenario, the patient has an adequate pulse but inadequate respirations. Provide rescue breathing by delivering a supplemental breath every five to six seconds. If a patient has an adequate pulse and abnormal breathing, it could be an opioid or heroin overdose, so make sure to assess for those and administer an antagonist such as naloxone (Narcan) if needed.
Scenario 3: No pulse and not breathing normally
In the third scenario, the patient has no pulse and is not breathing. Patients with gasping respirations are not considered breathing, which may be confusing. Remember, while respirations may still occur during the initial moments of an out-of-hospital or in-hospital cardiac arrest, breathing consists of sustained, rhythmic ventilations every five to six seconds.
Administer chest compressions using a compression to ventilation ratio of 30 compressions to 2 breaths. The rate for cardiac compressions is 100–120 compressions per minute. The chest compression depth is at least 2 inches deep without exceeding 2.4 inches.
Check for a pulse and assess for breathing at the same time. You’ll feel for a carotid pulse while checking for a chest rise. Don’t spend more than 10 seconds on the assessment.
At this point, there are three patient algorithm scenarios.
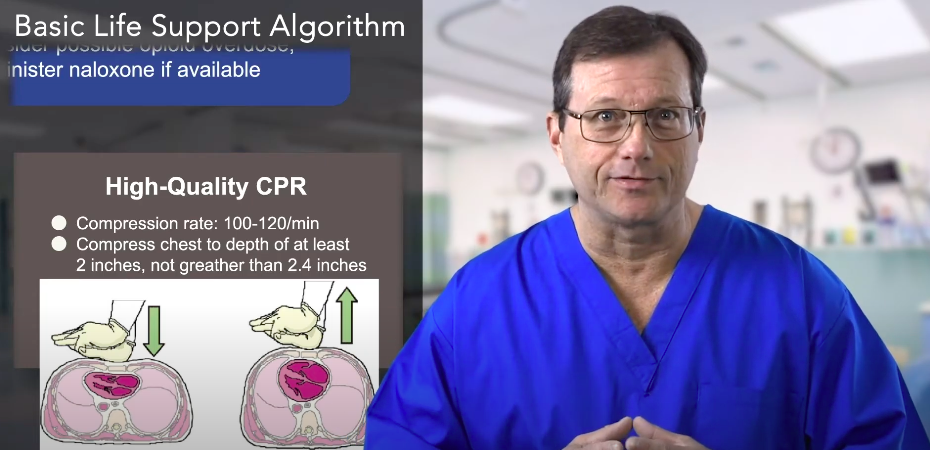
High-quality CPR involves adequate compression depth and compression rate.
Make sure your hand placement is correct. Place the heel of your hand on the lower third or lower half of the sternum, above the xiphoid process. If your hand is too high, the ribs will be too close together. You’ll have to maneuver them and won’t be able to get adequate depth. Make sure your hand’s heel is in the lower part of the sternum.
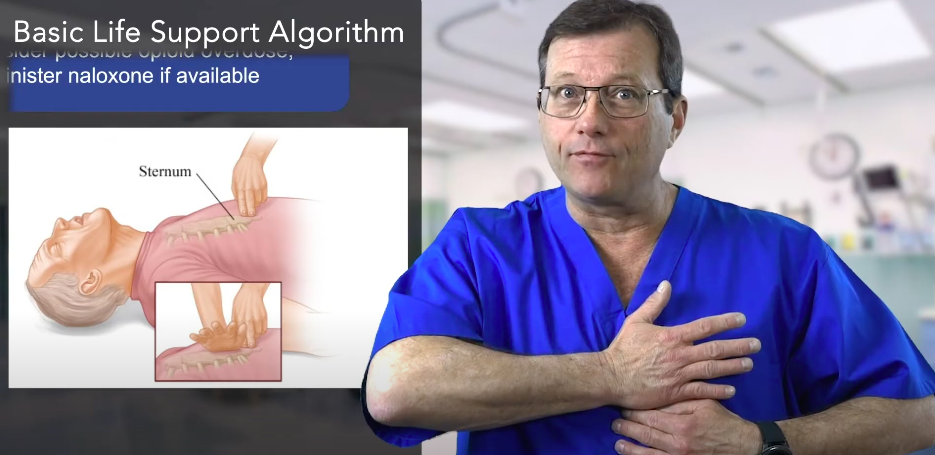
Place the heel of the hand in the lower half of the sternum.
Step 5: Apply the AED and Follow Prompts to Assess Rhythm
Step 5 is to assess the cardiac rhythm. Place the automated external defibrillator (AED) on the patient as soon as it arrives. Expose their upper body and place the pads anterolaterally on the chest. From the patient’s perspective, one pad is placed on the high right side of the chest and one on the low left side. Make sure the heart is in between the pads. For a simple explanation of how AED shocks differ from chest compressions, review CPR and defibrillation.
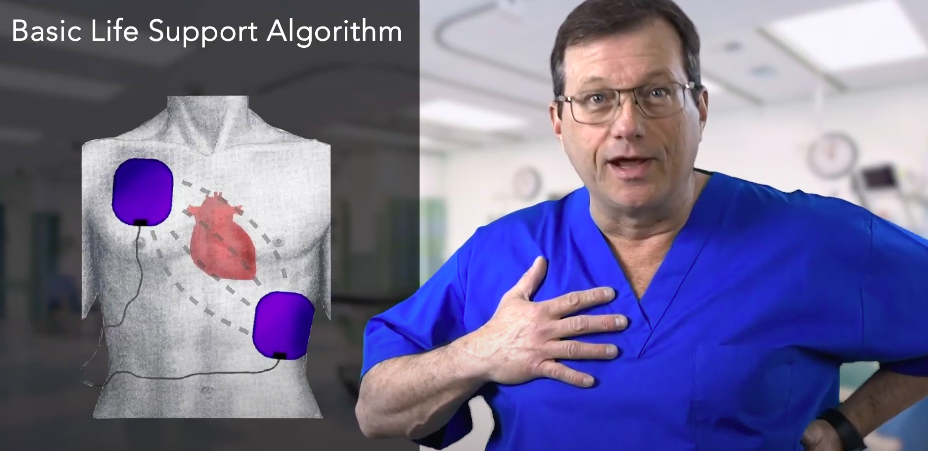
Proper pad placement is anterolateral. Notice that the heart is in between the pads.
How to Use an Automated External Defibrillator (AED)
This video reinforces Step 5 by showing safe pad placement, how to follow AED prompts, and how to ensure everyone is clear before analysis and shock delivery. Use it to build confidence with the AED workflow during real-time resuscitation.
Step 6: Decide if the Rhythm is Shockable
In step 6, determine if the rhythm is shockable. If it is, proceed to step 8. If not, proceed to step 7.
Step 7: Continue CPR When No Shock is Advised
If the AED says no shock is advised, continue chest compressions and ventilations until professional help arrives.
Step 8: Deliver a Shock When Advised and Resume CPR Immediately
If the AED says the rhythm is shockable, administer one shock. Make sure you clear the patient before shocking them. Everyone must know you’re going to administer a charge. Scan the patient from head to toe, ensuring no one else is touching them. You don’t want to shock a bystander.
Right after the first defibrillation, resume chest compressions for two minutes, then reassess the rhythm. Some AEDs will prompt you to do something else. For example, some may say not to touch the patient after administering the shock because the AED is reassessing the rhythm to see if the shock was effective. But, according to the AHA algorithms, immediately resume chest compressions after defibrillation for two minutes before reassessing the rhythm.
Basic Life Support for Healthcare Providers
This video provides a practical overview of Basic Life Support techniques used by healthcare professionals during cardiac and respiratory emergencies, exactly as taught in a certified BLS course. It reinforces high-quality CPR, early defibrillation, effective airway management, and team-based response, all of which are essential for improving survival outcomes.
Viewers will see how BLS steps are applied in real scenarios and how care differs based on patient age and condition. Understanding these principles prepares providers to transition smoothly into advanced care when needed. While this page provides a broad overview of Basic Life Support, providers should review age-specific algorithms for deeper guidance. The pediatric BLS algorithm and the adult BLS algorithm for healthcare providers cover compression depth, ventilation strategies, and AED use tailored to specific patient populations.
Special Situations in BLS
Some emergencies require small but important modifications to standard BLS. In drowning, prioritize ventilation early because hypoxia is the primary problem. In suspected opioid overdose, provide rescue breaths and give naloxone when available while continuing BLS steps. In trauma, address severe bleeding quickly and use cervical spine precautions if indicated. In pregnancy, perform chest compressions as usual but consider manual left uterine displacement to reduce aortocaval compression; for the full in‑hospital pregnancy arrest workflow and perimortem cesarean guidance, see the Cardiac arrest in pregnancy — In‑Hospital ACLS algorithm. In hypothermia, continue resuscitation while preventing further heat loss and follow local guidance for prolonged resuscitation when appropriate.
One Rescuer vs. Two Rescuer BLS Algorithm
As a single rescuer, you perform the full sequence alone: assess, call for help, start CPR, and apply the AED as soon as it arrives. When two rescuers are available, one focuses on compressions while the other manages ventilation, AED setup, time tracking, and role support. Switch compressors about every 2 minutes when possible to reduce fatigue and maintain consistent depth and rate. Clear communication, closed loop confirmation, and minimal pauses for rhythm checks are easier with a two person team.
Tips to Avoid Common Mistakes
- Do not delay compressions. Start CPR as soon as you confirm no normal breathing and no pulse within 10 seconds.
- Minimize pauses. Keep interruptions under 10 seconds for rhythm checks and shocks.
- Compress deep enough and fast enough. Aim for consistent depth and a rate of about 100 to 120 per minute.
- Allow full recoil. Leaning reduces venous return and lowers cardiac output.
- Use the AED early. Apply pads as soon as the device arrives and follow prompts.
- Rotate compressors. Fatigue is a major cause of shallow compressions.
Summary
ACLS only works if preceded by life saving, high-quality basic life support. There are several steps to effective BLS. You’ll assess the patient, checking to see if they’re responsive. Possible courses of action include a combination of chest compressions, AED charges, and monitoring depending on the patient’s pulse and respiratory ability.
Basic Life Support works best when each step is performed quickly and consistently. Confirm scene safety, check responsiveness, and assess pulse and breathing within 10 seconds so you can start the correct pathway without delay. For neonatal emergencies, providers follow the NRP algorithm to ensure appropriate care. If the patient is not breathing normally and has no pulse, begin high quality CPR immediately and use an AED as soon as it is available. Keep pauses short, follow prompts, and reassess regularly until advanced help arrives. The most important takeaway is simple: act early, compress well, ventilate when needed, and defibrillate quickly when indicated.
More Free Resources to Keep You at Your Best
Editorial Note
ACLS Certification Association (ACA) uses only high-quality medical resources and peer-reviewed studies to support the facts within our articles. Explore our editorial process to learn how our content reflects clinical accuracy and the latest best practices in medicine. As an ACA Authorized Training Center, all content is reviewed for medical accuracy by the ACA Medical Review Board.
More to Learn

Delve into the chemistry, dosing, and application of Lidocaine in ACLS. Read our article to master the use of this crucial medication for effective cardiac management.

Use the Tachycardia with a Pulse algorithm and detailed article to learn how to appropriately assess and treat this patient.